Tricks To Make U Shape Frock

Let Me Teach You How To Sew A Frock. In This Image You Can See A Frock And A Pant. The Kid Can Wear The Frock Alone Else The Pant Also.


This Frock Consists Of Two Parts , The Chest Part And The Umbrella Shaped Skirt Attached To It. First Draw The Stitching Pattern For All Parts To Get A Clear Idea. Now Take The Cloth To Be Stitched. Fold The Cloth Breadthwise Then Lengthwise , Place The Stitching Pattern And Mark The Edges. Next Cut Along The Corners Like The Image Below.


Stitch Umbrella Cut Frock

This Is An Umbrella Cut Frock . The Name Umbrella Is Because Of The Umbrella Shaped Skirt. Now Lets See The Stitching Pattern For It. I’ve Give The Readymade Measurements. Try Your Own Measurement Using Inch Tape.

Body Part

Measurement
Chest = 60 Cm, Waist = 55Cm, Neck = 25 Cm
Body Lenght = 25 Cm, Full Length = 60 Cm
Body Part

A-B = Body Length = 25 Cm
A-C = Armhole = Chest/4 = 60/4 = 15Cm
C-D = Chest Loose = (Chest/4)+2.5 = 17.5 Cm
A-E = Shoulder = Ab/2 = 12.5 Cm
A-F = Neck Breadth = Chest/12 = 5 Cm

Skirt Part


A-B & A-C = Skirt Lenght + (Chest/6)= 45 Cm
A-E & A-F = Chest/6 = 10 Cm

Using The Stitching Pattern Draw The Patterns Using Paper. First Fold The Cloth Breadthwise Then Lengthwise, Next Place The Body Part Stitching Pattern And Mark The Edges And Cut Them Carefully.

Next Join The Shoulders, Then Stitch The Neck Part Using Cross Piece. The Next Thing To Be Done Is Side Joints, Stitch And Join The Sides. Cut The Center Of The Back Part For The Hooks To Be Stitched.

Next Is The Body Part, Keep The Pattern On The Cloth. The Cloth Should Be Folded Breadthwise First Then Lengthwise. In The Stitching Patter Cut And Throw The A-E And A-F Part And Also The Part After The Big Umbrella Curve.Next Mark The Edges And Cut Them Carefully. You Can See A Umbrella Shaped Bottom When You Unfold The Cloth.

Stitch And Join The Bottom To The Front Part. Now The Umbrella Cut Frock Is Ready


Stitching Tricks

First Thing To Learn Before Stitching Is Pattern . Pattern Is A Revision Like Before You Could Move Onto The Real Cloth.

* Pattern Is A Paper Work.
* Pattern Is A Pictorical Representation Of Our Dress.
* Pattern Will Help You To Stitch Dresses With Accurate Measurements And Also To Avoid Mistakes. Beginers Must Use Patters Before Cutting Clothes Directly.

* Ur Dress Is Divided Into Four Parts.
* Front Left, Front Right , Back Left And Back Right.
* Its Enough For A Pattern To Draw Only One Part That Is Front Left Or Front Right. With That Pattern We Can Use It To Model The Entire Dress.


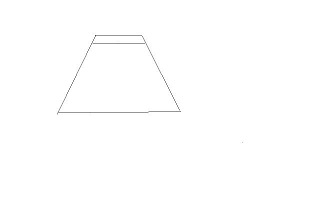
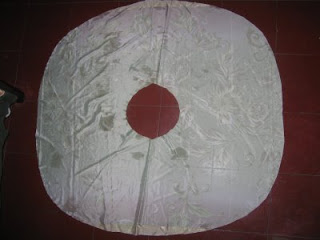
* This Is A Normal Skirt . Before Stitching The Skirt, First We Have To Draw Pattern Using News Paper Or Chart.
* Next Im Gonna Divide The Model Skirt Into Two As Only One Part Is Required To Draw Pattern.


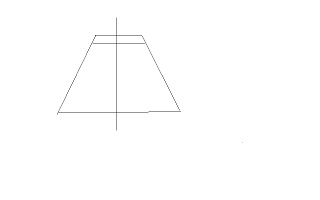
* You Can See The Divided Part Of The Skirt , This Part Alone Is Enough To Model The Entire Dress.
* Use All The Measurements And Draw The Pattern After That Take The Cloth To Be Stitched.
* First Fold The Cloth Breadthwise Then Lengthwise, So That The Cloth Has To Be Folded 2 Times.
* Then Keep The Pattern On The Cloth And Mark The Edges With Marking Chock.
* Then You Can Cut The Cloth And Unfold Them . You’ll Able To See The Front And Back Side Piece.
* All You Have To Do Is Join Them Using Stitches.
* So With One Part Of The Pattern We Are Able To Get The Whole Cloth Stitched.

 HOW TO SEW ?

In Today’s World The Garment Industry Has Grown Very Well. The Sewing Machine Has Taken A Major Part Of Life In Every Human Being. In Early Days Sewing Machine Was Manufactured Only In Some Countries But Now Most Of The Countries Manufacture Their Own Sewing Machine With Well Experienced People.

Its Happy To See Each Home Owning Their Own Sewing Machine. From This We Can See The Importance Given To Sewing Field. Everyone Knows That The Sewing Industry Is The Appropriate Field For A Person To Start A Small Scale Business.

Sew Denotes A Women. Sewing Industry Is Very Well Appropriate For A Women To Work. Nowdays There Lots Of Institution Who Teach The Pattern Work And The Sewing Work. There Are Also Lots Of Universities Which Offer Degree Courses For Sewing And Fashion Field. Women Use These Opportunities And Stitch Their Own Cloths. The Art Of Sewing Which Has Grown To Such An Extend Is A Great Success To The Sewing Industry.

Now Let Me List Down The Needles That Are Used In Sewing Machine.
Cst 3 = Canvass Cloth
C4,5 = Cloths With Plastic Coating
Mc 6 = Woolen, Terrin, Terrin Cotton
M 7 = Silk Cloths
Mf 8 = Vayil Cloths
F9 = Polyester

Cst = Coarset
C = Coarse
Mc = Medium Coarse
M = Medium
Mf = Medium Fine
F = Fine
Sewing Machine Have Taken A Lot Of Development And Enhancements . The Sewing Machine Have Become An Friendly Machine To Most Of The Women.

Kaza , Hemming , Botton Attachment Have All Inserted In The Sewing Machine. The Users Find It Very Easy To Use The Sewing Machine. Today’s Village , Rural Womens Can Start Up A Small Scale Industry Using Two Or Three Sewing Machine. This Field Is Very Well Appropriate For These People And It Helps Them To Develop Themselve Quickly.

The Glooming Sewing Machines Have Made The Garment Industry Easier For Them To Stitch The Readymade Dresses. Lots Of Garment Industries Are Started Day By Day And Many People Are Depended On It Which Increases A Lot Of Production. The Fashion Field Is Glooming Day By Day And Many Young Minds Are Involving In It.

WOMEN PHYSICAL  STRUCTURES

The Truth Is That A Women’s Body Shape Is Not Compared With Another Women’s Body Shape. Anyways The Variation Of Size In A Women’s Body Must Be Learnt And A Women’s Body Size Should Be Compared According To It.

Breast Size = 33″
Waist Size = 26″
Hip Size = 37″
According To The Nature Of Science The Difference Between Breast Size And Hip Size Is 4 Inch. Basically A Women Should Have 4 Inch Difference.

Breast Size = 35″
Waist Size = 28″
Hip Size = 38″
According To The Above Measurement , The Breast And Hip Size Vary 3 Inch.

Breast Size = 37″
Waist Size = 30″
Hip Size = 41″
Breast Size = 39″
Waist Size = 32″
Hip Size = 43″
The Above Measurements Have A Difference Of 4 Inch Between Breast And Hip. From The Above Examples Remember That The Difference Between The Breast Size And Hip Size Is 3 To 4 Inch. Women With Breast Size 41, 43, 45, 47 Inch Will Have Breast And Hip Size Difference Of 5 Inch. Now We Can Also Find The Difference Between Hip And Waist Size.

Hip Size = 37″
Waist Size = 26″
Difference = 11″
Hip Size = 38″
Waist Size = 28″
Difference = 10″
From The Above Measurements When Comparing The Hip And Waist Size We Get 10 To 11 Inch Difference. Womens Waist Part Is 10 To 11 Inch Smaller Than The Hip Part. Womens Figure Is Classified Into 3 Types.

Normal Figure
Women Having Equal Size Difference Between The Breast , Waist And Hip Parts Are Referred As Normal Figure. If The Womens Size Difference Follows The Above Measurements Than It Is Normal Figure.

Lean Figure
Women Having This Kind Of Figure Will Have Lesser Measurements Compared To The Normal Figure. The Size Variation Between Parts Will Be Smaller Compared To The Normal Figure. Women With This Kind Of Figure Is Called Lean Figure.

Stout Structure
Women With This Kind Of Structure Will Have Size Greater Than The Normal Figure. These People Are Fat People.


Within 2 Hours Make Your Own Designer Skirt

Learn to sew an elastic waistband skirt, Learn to make your own clothes. This project is easy and should be your first sewing project.

This Learn to Sew project makes a great first project for making your own clothes. With this quick and easy skirt tutorial, you will be able to sew a whole new wardrobe in a weekend! This easy-to-sew skirt is our number one recommended project for our new sewing students in the studio, and it can be found in many colors, prints, and fabrics on the runway in our annual fashion show! We even showed the skirt in our ad for VOGUE magazine!

Love to sew studio shows you how to make a skirt pattern and sew a skirt. A great first project in learning to sew your own clothes. First, go to our Pattern Making Page, and make yourself a skirt pattern.
Love to sew shows you how to sew your own skirt step by step. Once your pattern is made, cut 2 on the fold of your fabric, one piece will be your skirt back and one will be your skirt front.
Love to sew studio shows you how to sew your own clothes with these step by step photograph instructions. Stitching the side seams:(Normally you would use black thread on black fabric to hide your stitches, but I will be using yellow thread so that you can see the process and stitches better in the photographs.)

With your skirt front and back PRETTY SIDES TOGETHER, pin your side seams as shown in the photo. 

(Pin both sides, only one side is shown.)

Love to sew studio shows you how to sew your own clothes step by step. Stitch your side seams using a straight stitch and using a 5/8″ seam allowance.

Love to sew shows you how to sew your own clothes step by step.

All seams must be finished. Open your seam and zigzag stitch on each side of your seam allowance making sure you do not catch any fabric of your garment. Zigzag on/off the edge of each seam allowance. Click on the link above for further explanation.(Make sure your skirt is not under the seam as you zigzag. This photo shows what it will look like when it is done.)

Love to sew shows you how to sew your own clothes step by step.

Press the seams open.
Love to sew shows you how to sew your own clothes step by step. Making an elastic casing:Fold under the top of your skirt 1/4″ seam allowance. Stitch down the center of the seam.
Learn how to sew an elastic waistband skirt with these easy to follow photograph instructions from Love to Sew Studio. Fold waistline again but this time 1 and 1/2 inches. Press and pin. Leave an opening about 3″ in the back. Use a chalk line to show where not to sew.This opening is where we will put the elastic through.
Love to sew shows you how to sew your own clothes step by step. Stitch around the waistline leaving an opening where your chalk line is.Stitch again along the top using the pressure foot as your guide. This forms a more professional looking casing.
Learn to sew an elastic waistband skirt with these easy to follow step by step instructions. Measure your waistline where you like to where your skirts, and cut elastic the same size.  With a large safety pin put the elastic through the casing around the top of the skirt.(You may want to pin the other side of the elastic to the skirt so that it doesn’t end up coming out of the casing.)
How to sew an elastic waistband skirt step by step instructions. Stitch the elastic together. Make sure you stitch it good going back and forth or stitch a rectangle as shown in the photo.
Love to sew shows you how to sew your own clothes step by step. Try on the skirt and see if the elastic feels okay and fits good. If so, stitch the opening closed.
Love to sew shows you how to sew your own clothes step by step. Hemming the skirt:Try on your skirt again for your last fitting with the shoes you will be wearing with the skirt.  If possible while you are wearing the skirt have some one else mark the spot where you would like the hem to be.

Cut 1″ below the line.

Fold up your hem 1/4″ – 1/2″ and press.

Learn to sew your own clothes step by step instructions. Fold up your hem 1/4″-1/2″ again and stitch using a top stitching effect.

This skirt is an easy project to start with in learning to sew your own clothes.

Your skirt is done. You just were a pattern maker, designer, and seamstress!!! Great job!

Many things can be added to a skirt to embellish it.  Be creative! Some of our favorites are shown below.